Category Archives: DIY

Experimentation with Fermentation! Part 2

My maiden name is Guenther, and my dad’s side of the family has a pretty German heritage, but somehow or other I don’t think I ever tasted sauerkraut until I was an adult. Most likely my mom, who is all Irish, didn’t fancy the stuff. So it just wasn’t something I ever ate as a kid, and I must have therefore figured it was a “yucky” food, and never sought it out. Until one day I was visiting some relatives on my own after college, and they had sauerkraut as a side dish. I enjoyed it from the first tentative bite! It was like pickles, sour and salty and a bit crunchy. I started buying it at the store from then on – not religiously, but when I remembered it as a flavorful condiment.

After learning more about fermented foods, recently, I have decided that homemade sauerkraut is the next project!
And not only that, but I decided I first needed to make my own ceramic crock to ferment it in, being that I am a potter, after all.

dsc04799w

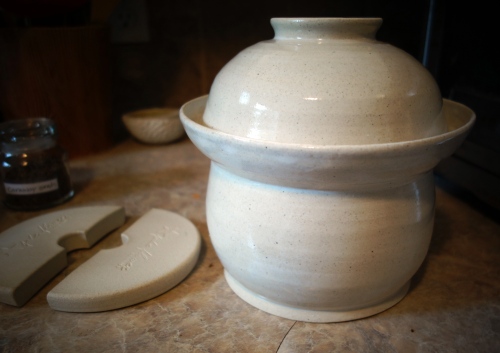
My first attempt at a handmade fermentation crock

Now that I had a crock to ferment in, here’s the process I followed for homemade sauerkraut!

dsc04791w

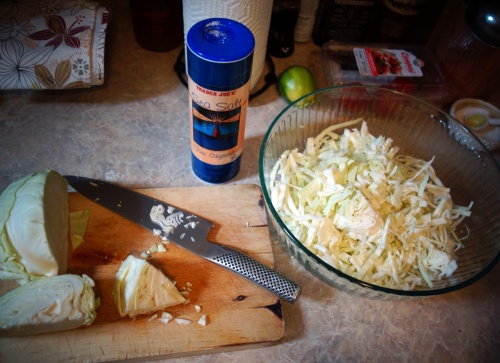
Chopped Cabbage and Salt

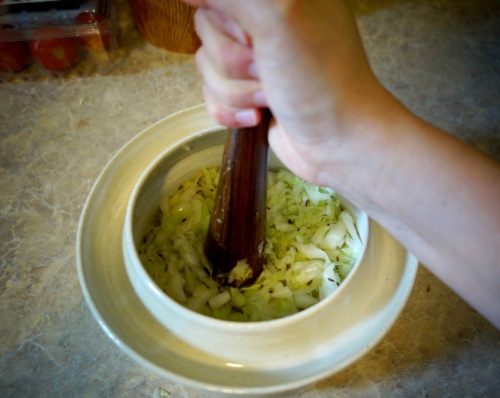
I filled a huge bowl with chopped cabbage. Just one head, about 2 lbs. One head of cabbage was more volume than I expected! But then I added sea salt, probably about 3 teaspoons (I didn’t measure), and started squeezing the buhjeezus out of it.

dsc04793w

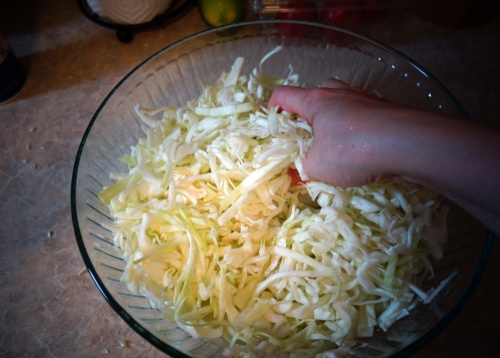
Massaging the salted cabbage

This got the cabbage all coated with the salt, and already it started drawing the water out. After walking away, and then coming back to repeat the massaging process every 10 minutes or so, the cabbage really started releasing its juices.

dsc04800w

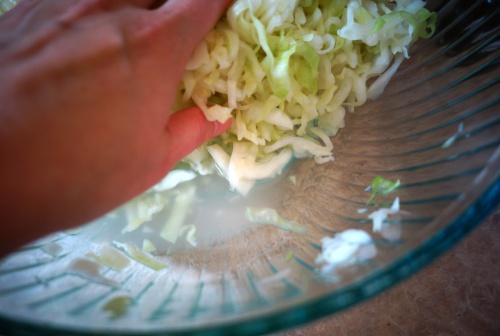
Cabbage juices pooling in the bowl

After an hour of this, I felt the cabbage was sufficiently reduced in volume and wilted enough to start packing into the crock. I tossed in a teaspoon of caraway seeds (because Michael Pollan added some to his in Cooked), and then into the crock it went, handful by handful.

dsc04801w

Pounding down the cabbage

I used a cocktail muddler to really pound down the cabbage. This forces out the air, packing it down, and it gets the water to continue squeezing out of the cabbage. The cabbage juice (or brine) needs to be at a level above the solid cabbage; this protects the kraut from exposure to air, which can cause it to mold (bad).

dsc04804w

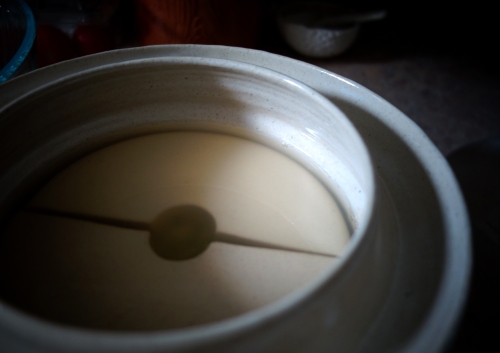
Weights to keep the kraut submerged below the brine level

Once I felt I’d pounded enough, and the cabbage was sufficiently juicy, I topped them off with two half circle ceramic weights I’d also made when I made the crock. These will keep the kraut from floating to the top and getting moldy. The bacteria that transform the cabbage in to sauerkraut prefer an oxygen-free environment, so that’s the environment I intended to create.

dsc04805w

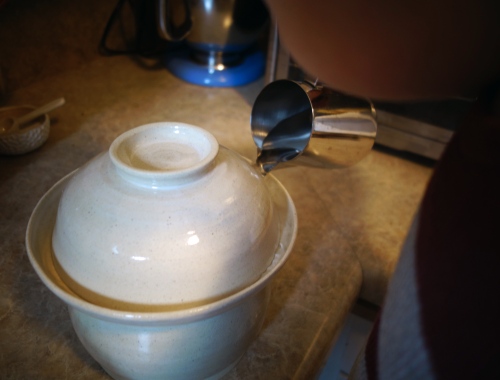
Adding water to the moat creates an airlock

The photo above shows my little helper Ethan, pouring the water into the reservoir around the crock lid. The water will let CO2 out (it’ll “burp” to release pressure), but won’t allow any air to go in.

dsc04806w

My kitchen helper

Look how proud he is, helping Mama. Nevermind that he spilled most of the water on the counter, haha. By the way, how is it possible that this kid is two-and-three-quarters already?? Obligatory observation on how time flies.
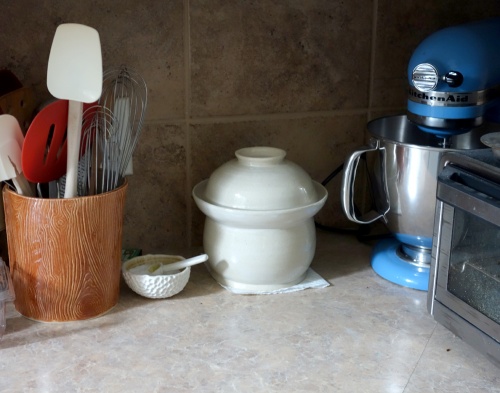
dsc04820w

And now we wait…

So that’s it! Now my pretty little crock will live on the kitchen counter for a few weeks, and hopefully it will produce a yummy, probiotic sauerkraut!

And out in my studio I’m working on improving my design. Swing over to my Jadeflower Ceramics Etsy Site – I’ll have crocks like this (better, even!) for sale in my Etsy shop.

Here’s to my continuing fermentation adventure! Bye for now!


Leave a comment

Filed under DIY, Fermentation, food, Recipes, tutorial, Uncategorized

DIY Pull-over Bib with a Bow Tie

OK, so having a baby now doesn’t give me as much time to do the millions of things I have swimming around in my head. But here’s a project I absolutely forced myself to carve out time for.

DIY Bib with bow tie

The little guy is a big drooler at the moment (he’s almost 4 months now, so I guess teething is a thing that starts around now?) and he basically soaks through 2-4 bibs a day. A lot of the bibs that he was gifted (usually as a set with a matching onesie) are teeny, and not really very useful. But two that we got were basically towels with a hole cut out for his head. Ah Ha. So I decided to try my hand at a cute version  – with a bow tie! Perfect for those “special” occasions, ya know. (Seriously, with wedding season coming up, not to mention just fun holidays and stuff, this little extra detail will be my one effort to cute-en him up).


Pull-over Bib with Bow Tie Tutorial
Materials:
>terry cloth (I bought1/2 yard at the fabric store, but you could easily use a towel)
>backing material (on my first bib, I just used another layer of terry cloth. on this one I used polar fleece)
>double bias tape
>stretchy rib-knit fabric for the collar
>colorful fabric for the bow tie
>thread, pins, scissors & sewing machine

bib fabricStep ONE
Cut out your terry cloth and backing fabric to 15″ x10″


cut head holesStep TWO
Cut out the hole for the head. My babe is about 4 months, and I wanted the bib to be somewhat snug while still comfortably fitting over his head. I made the opening diameter 5 inches. Positioned 2″ from the top and centered from side to side.


two layers sewn togetherStep THREE
Pin together your two layers (right sides facing outward). Sew a 1/4″ hem all the way around, and radius your corners (I used a light colored pen to mark the corners as a guide).


Trim the fabricStep FOUR
Trim your shape to about 1/8″ from your stitching. This will get covered up by bias tape later. Pin around the neck hole.


Pin bias tapeStep FIVE
Sew around the neck hole with a V stitch (or use a serger). Then pin your bias tape around the perimeter of the bib. (This is a pretty good tutorial on how to sew with double bias tape and not have it turn out all wonky)


bias tape addedStep SIX
Stitch on the bias tape!


assembling the collarStep SEVEN
Cut a strip of knit ribbing 2.5″ x 11″. Fold it in half and sew the ends together with a V stitch. Then fold the whole thing over like a turtle neck.


pin collar to the neck holeStep EIGHT
Pin the knit collar to the neck hole, matching the tops, bottoms and two sides. This will keep the stretch of the collar uniform.


collar attatchedStep NINE
Sew the collar to the neck hole with a V stitch, making sure the sewn part happens on the back side of the bib. (This was probably the trickiest part of this project for me.)
And there you have a functional bib!

…and here’s adding the bow tie detail…

rectangle for the bow tieStep TEN
With your colorful fabric, cut a 5″ x 4.5″ rectangle. Fold lengthwise, right sides facing inward. Stitch almost all the way around with a 1/4″ seam allowance, leaving enough of a hole to flip the rectangle right-side-out. Once it’s flipped right-side-out, fold in your opening hole, and then stitch all the way around as close to the edge as you can.

sew the tie middleStep ELEVEN
Sew a tube for the middle of the bow tie. I did mine from a long rectangle 2.5″ wide, giving me a 1″ strip when it was turned right-side-out.

pinch the middle to make a bow shapeStep TWELVE
Pinch the middle of the big rectangle (like an accordion fold) and wrap the smaller fabric strip around it. Trim off the excess from the strip, and stitch it into place. Now you have your bow tie!

attatch the bow tie to the bibStep THIRTEEN
Position the bow tie pretty close to the collar and pin into place. Hand-stitch all around to secure in place (this will keep little hands from grabbing loose edges and pulling the bow tie off, with their orangutan strength).


And there you have it! Slip the bib over your little one’s noggin and enjoy the cuteness. (Pay no attention to the crazy-eyed daddy)
bow tie bib

Something I learned while making this bib – terry cloth is MESSY! Cutting it will make a confetti of little cotton snow all over the place. And it will probably take a couple washings before the bib stops shedding them. Pbbt 😛

1 Comment

Filed under Baby, Crafts, DIY, projects, sewing, tutorial

A valentine fort

I don’t consider myself the romantic type. I find most classic examples of romance (in the real world) to be, well, embarrassing. I’m much more comfortable with cute gestures of love than steamy, sensual, dramatic ones! What can I say, it’s just not me.

So anyway, M & I were talking about what to do for Valentine’s Day this year, and since I have no spare cash, after just paying my taxes (ouch), I suggested we just stay in and have a nice meal. And I mentioned, “oh and we should build a fort!” To which M just chuckled.

Little did he know. I was going to build a fort.

I grew up in a family with 3 brothers, and one of our favorite things to do was construct elaborate forts in the living room, from couch cushions, sheets, blankets and furniture. But my inspiration for this Valentine’s fort was from this picture:

Valentine’s Day Fort via Design*Sponge

This is my kind of romantic.

I wish I could say I have all kinds of rich tapestry linens hanging around my house, but I had to make due with what I could scrounge from my closets.
I found 3 gauzy curtain panels, a couple of flat sheets, 2 lengths of lace, and just about every throw blanket and pillow in the house.

my valentine fort

my valentine fort

I used the method in the Design*Sponge post – draping the sheets over a broom handle suspended from the ceiling, string and safety pins. I also used a large embroidery hoop in the front, from which the airy curtains hung.

Sure, it took me 2-3 hours to make this thing! Ah the perks of being one’s own boss. That’s right, I gave myself the afternoon off for this special occasion. 🙂

cozy living room fort

cozy living room fort

I also made some chocolate truffles (what’s Valentine’s day without chocolate?).
The last finishing touch was gussying myself up. On a normal work day, since I work with clay all day and my studio is home-based, I wear jeans, a t-shirt, and my work sweatshirt. Rarely do I put on much make-up if I’m not going to see people.

For Valentine’s day, to complete the surprise, I wore this dress, an Anthro find from several years back:

Doris Shirtdress – Anthropologie

It’s super fun and colorful, and very retro 50s.
Then I did my face up all pretty-like.

The whole thing was worth it when M got home, came through the back door, to find this leading him into the living room…

candlelit pathway

candlelit pathway

And then this on the other side…

valentine tent and a bottle of wine

valentine tent and a bottle of wine

The look on his face. Priceless. How can you not love a surprise living room fort? 😀

The rest of the evening was spent on the floor, with wine, dinner and a movie. Now that’s my kind of romance.

2 Comments

Filed under DIY, Holidays, projects

Pigs in Space costume: Happy Halloween!

So here is my final post, wrapping up my process of creating a Miss Piggy Halloween costume – the Pigs in Space 1st Mate Piggy costume!
Where I attempt to transform myself into this iconic pig:

Miss Piggy – Pigs in Space

In my previous 3 posts, I went over how to make Miss Piggy Ears, sew a Pigs in Space uniform dress, and make a Pigs in Space felt logo decal. Now we put it all together with accessories!

First Mate Piggy – finished costume!

Now, you can see, I stitched the felt decal onto the front of the dress. And I also stitched the ears onto the wig itself – which was great, since there was no bulky headband or obtrusive clips. And I can snip the threads later if I want to use the blonde wig for something else in the future!

First Mate Piggy costume – headshot

So here’s the breakdown of the Pigs in Space costume accessories:

First Mate Piggy, accessories!

Now, the above collage is more of a wish list for this costume, but I think I made due with what I had, or could get on short notice 😉

First! A blonde wig. Very important to have the right hair. The wig I found was a tad bit too blonde, if you know what I mean. Classic Piggy hair is really more of a dirty blonde. You know, ‘cuz she was natural back in the day. (It’s so obvious that Piggy bleaches her hair these days, haha).

Classic Miss Piggy – pigs in space

Next, the eyes! Piggy’s signature look is thick luscious eyelashes and a pink/purple eyeshadow. Also, her eyes are slightly downturned. I achieved this look with a thick line of eyeliner, false eyelashes, and a layered application of pink and purple shadows on the lid.

sultry Miss Piggy eyes 😉

Next comes all the silver! Miss Piggy always wears gloves, and in her Pigs In Space costume, she trades her signature purple gloves for silver ones. I found mine on Amazon.
Then you’ll need a silver belt. Of course, you can make one, but I lucked out and found a shiny metallic belt at my local Goodwill for $4. Score!

Then we get into debatable territory. Since most Muppets don’t exist below the waist, the only reference I had to go on for the bottom half of Piggy’s costume was from an action figure:

First Mate Piggy doll

You can see she has silver leggings and silver knee-high boots.
As luck would have it, I already owned some shiny silver leggings (from two Halloweens ago – when I dressed as a Cyberman..er..woman). They are from American Apparel, and pricy, but I’m glad to get multiple uses out of them!

Then the boots…well, I didn’t want to splurge on silver boots when I’d probably never wear them again. So instead, I used my off-white boots, which were from my Princess Leia costume from 5 years ago. Lol…yes, I generally choose very nerdy subjects as Halloween costumes. I’m cool with that.

First Mate Piggy costume – Happy Halloween!

So there you go! Happy Halloween to all you folks. Hope it’s a fun one! Kissy kissy!

7 Comments

Filed under DIY, Holidays, projects, sewing, tutorial

First Mate Piggy Costume Tutorial: Pt 1 – Piggy Ears

October is here, and that means pumpkin flavored everything, changing leaves, and of course, gearing up for Halloween! I love Halloween, and the craftiness that goes along with it. Ever since I was a wee one, my mother always made our costumes – I don’t think I once got a store-bought one. At times I thought this was so unfair – seeing those shiny racks of pre-made costumes at the store. But now it is quite obvious to me how lucky I was to have a mother with creativity and the desire to make something from scratch for her children.

To this day, if I wear a costume, you can be sure I made or assembled it myself. This year is no exception! I got it in my head earlier this year that I wanted to do something Muppet related. Then I narrowed it down to Miss Piggy. But Piggy is such a fashion diva! I couldn’t decided on an appropriate outfit.

Then – inspiration! Pigs in Space! First Mate Piggy has the most rockin’ space getup. Light purple with silver accessories. Iconic and classic.

Pigs in Space First Mate Piggy

I’ll have a full tutorial on how to make a Pigs in Space outfit soon.
But first! No Muppet pig is complete without ears, so here’s how to make a simple pair!

Materials:
Pink/Peach colored felt
Thread in matching color
Ear Template: Piggy Ear Template
Straight pins
Sewing machine (optional)

Step One:
Print and cut out your ear template. Trace 6 ears onto your felt.

Miss Piggy Ears step 1

Miss Piggy Ears step 1

Step Two:
Cut them out. Each ear will use 3 pieces (I used a red layer, because I ran out of pink – don’t be like me!)
I used three layers to make the ears more solid and sturdy.

Miss Piggy Ears step 2

Step Three:
Line up your three pieces and secure with a few straight pins. Stitch a seam, using the Template as a guide (be sure to leave an opening for turning it inside-out). A sewing machine makes this super quick, but it can be done by hand too.

Miss Piggy Ears part 3

Step Four:
Admire your stitching job.

Miss Piggy Ears part 4

Step Five:
Carefully turn the ear inside-out, so the seam is on the inside.

Miss Piggy Ears part 5

Step Six:
Using your fingers, smooth out the inside seam and shape the edge into a nice ear-shape.

Miss Piggy Ears part 6

Step Seven:
Pinch the open edges together so the ear cups in to form a concave shape.

Miss Piggy Ears part 7a

Miss Piggy Ears part 7b

Step Eight:
You can use your machine again to close this seam, or you can do what I did and hand-stitch it closed. Be sure to get through all layers of felt.

Miss Piggy Ears part 8

FINISHED!

Miss Piggy Ear finished!

Then you’ll make a second ear the same way, because they work well in pairs.

Miss Piggy Ears – the finished pair

From here, you can attach them to a headband, or hair clips, or stitch them directly onto a blonde wig!

I haven’t decided yet which method I’ll use. But they sure are cute ^_^

me in my piggy ears

Stay tuned for my First Mate Piggy space dress Tutorial later in the month!

4 Comments

Filed under DIY, Holidays, sewing, tutorial

Reflecting on July

This month I had another small re-vamp project that was on the list for ages. I seem to have a penchant for mirrors with decorative frames, especially if they are oval. So when I found this large ornate brass-colored mirror frame at Goodwill (for $5!!), there was no way I wasn’t taking this baby home with me.

brass-colored mirror frame

Yes, it also had a mirror, it’s just not pictured here….because – wait for it – I decided to paint the frame! I’m sure you saw that coming. 🙂
The moment I saw it, I knew this frame would look so great in a solid color, to update the look, give it a more modern vibe. It is plastic (not metal), and the brass finish was a bit too grandma’s-house for my current decor tastes. So I settled on a glossy white (mainly due to the fact that M had purchased a can of spray paint in this color recently and there was nearly a whole can of it left over, score!).

So after many many thin coats of paint later:

mirror frame refinished in white

I love how it almost looks like a plaster, with just a hint of gloss.
You may notice in the reflection…yep, those are garage doors. I’m hanging this guy in the garage, in my studio to be exact. 🙂

the jadeflower ceramics studio

My studio space is still ever-evolving in the decor arena; for the most part it is strictly functional. But here and there, I am trying to add little touches to make it a pleasant place to spend my hours. If you’ve been reading my blog for a while, you may recognize some past projects like this and this.

Our garage is a quirky place. Did you notice it looks like outdoor siding on that wall above? Well, M and I have a (strong) hunch that the garage was added much later to the house. Exhibit A: outdoor siding. Exhibit B: that rectangle the mirror is hanging in front of is actually a window that the landlord covered up with a big sheet of foam insulation (and which I then covered up with some striped vintage wallpaper because it was ugly!). Oh funny old houses 😉

In unrelated news, we had a busy July. One highlight was a housewarming party M & I hosted, now that we are pretty much settled into our new abode. We celebrated with tacos, fun drinks, and lawn games (with thankfully cooperative weather!). At the end of the evening we lit sparklers saved from the 4th of July! ^_^ Everybody loves sparklers, right?

sparklers!

The party was also to celebrate M and my first anniversary. Awwww 🙂 It’s hard to believe it’s been a whole year since this fantastic day. My mom and dad brought us a vase of hydrangeas cut from all the plants that were bought the year before; she says that they’ll always have a reminder of our wedding with all the pretty blues/greens/whites of the hydrangeas that now decorate their property.

hydrangeas

A very fun and event-filled month! And August should be just as busy! Until next time 🙂

1 Comment

Filed under Crafts, DIY, Events, Jadeflower Ceramics, projects, Wedding

Made in the Shade – a unique planter pot Umbrella Stand

It’s been a busy month (ahem, yeah, my last post was over a month ago), but M and I have finally been getting this house to feel like a home. One of the projects I really wanted to tackle was for our outdoor space  was a stand for my patio umbrella. Here’s how I did it!

DIY Planter Pot Umbrella Stand

I’ve owned this super cute, small canvas patio umbrella for years now, but it’s been in storage for a good 3 years or so because our last apartment didn’t have a space for it. Now that we have a big outdoor area to play with, I really wanted to bust it out!
The problem was, after scouting around to find a nice umbrella stand, I discovered that there are basically two camps: super ugly and cheap OR classy and way too expensive. The other idea was to find a thrifted patio table – the kind with the hole in the middle – but it turned out to be a much more difficult search than expected.

Finally I decided to make my own solution! An umbrella stand that would be unique, changeable, and inexpensive! Here’s what I did:

DIY Umbrella Stand Materials

Materials:
*Large Planter Pot – proportional to the size of umbrella
*Small Cinder Block (8x8x6)
*Length of PVC tubing – wide enough for umbrella handle
*Gravel
*Dirt
*Plants

Ceramic planter with drainage hole

Be sure your pot is a good size. Since it will be outside (and have plants that need water), be sure there is a drainage hole in the bottom!

Planter with cinder block

Place your cinder block in the center of your pot. Be sure it’s in a good position to put your PVC tube right over the drainage hole.

PVC tubing - Painted & Holes Drilled

I spray painted the top portion of my tubing a dark gray color, so the white PVC isn’t so noticeable. I also used a drill bit and my hand-held drill to put a few drainage holes in the bottom of the tube.

PVC & Gravel

With the PVC tube centered over the drainage hole, fill in the cinder block space with gravel until the tube is securely lodged in place.

Adding dirt to the planter

At this point, make sure your planter umbrella stand is located where you want it – it’s about to get really heavy! Next step is adding your potting soil.

pack it in there

Pack the soil in really well around the cinder block – you don’t want it to move!

Planter filled with dirt!

Once you’ve got the block hidden and the planter all filled, it’s time for adding pretty things! I had a few marigolds and snap dragons, but it turned out my planter wasn’t that big, so I just did the marigolds. If I were to do this again, I’d probably choose a trailing flower, like petunias or something, but I do think the happy yellow marigolds are cute. 🙂

umbrella stand planter with flowers

So there you have it! Simple yet effective!
Those flowers will fill in a bit, but even sparse as they are, I really like how this project turned out! And what’s great about it is, since I didn’t use cement or something permanent to affix the PVC tubing, if I get tired of this arrangement, I can disassemble the whole thing and I still have a great ceramic pot to use!

And the break down for price is pretty great:
*Ceramic Pot: $16
*Potting Soil (way more than needed for this project, btw): $5
*PVC tube: $1.25
*Spray paint: free (already had it)
*Gravel: free (gathered from the back alley)
*Cinder block: $.95
*Marigolds: $.95
TOTAL: $24.15

So yeah, good luck finding a nice free-standing umbrella stand at the store for under $25!

Outdoor living, here we come!

And now with the summer weather finally arriving in Seattle (we hope!), we’re one step closer to some awesome outdoor living!

9 Comments

Filed under Crafts, DIY, Plants, projects, tutorial

Raising the bar

Ok, I’m no good at making up clever blog post titles! Let’s just say this post is going to be about my search for a furniture solution – a place to store our liquor. 🙂

M and I aren’t huge drinkers, but for me coming from an Irish/German heritage, I like a good cocktail hour as much as the rest of ’em! Our new kitchen doesn’t have as much storage as our previous one did, so we’re having to get creative with all of our extra stuff that used to have a home. Our dining room is the biggest room in the house, so we’re making it do lots of double duty.

The wall adjoining the kitchen is already home to our coffee station, and now it is also home to our “bar”!

dining room storage: coffee and liquor!

This nice little furniture piece got a bit of a make over (but just barely).
It was a Goodwill find (aw yeah!) for just $12.99! I had been scouting all month for something that was about counter-height, had shelving/storage and was cheap. This baby had a really really beat-up top, lots of stripped finish, and didn’t look too attractive to the average passerby, hence the low price tag.

I knew just from looking at it, however, that it is solid wood (no particle board here!) and I could easily sand the top and re-stain it.

bar top sanded

Look at that – solid oak, I think. And no trace of the previously marred surface. Just a few minutes of sanding and it was ready for staining.

Goodwill find, sanded

I had some wood stain, left over from this project from last year, so I got to staining.

dark walnut stain

staining in process

There is something immensely satisfying about staining wood! After brushing it on and then wiping off the excess with a cloth, the color is so different immediately, I love it.
So after one application it looked like this:

one coat of stain

It really is a pretty wood. The dark walnut wasn’t an exact match for color, but it sure is pretty. I love that it has a bit of a rustic vibe. I did a second coat later in the day to darken it further. Then this morning I brought it back in the house.

After a thorough wipe down/cleaning, we have this!

new bar

I am not totally finished with it yet. I think that the top may need a hint of red – the base and the top don’t necessarily need to be the exact color, but I think since the walnut stain is so close, it will bug me that it’s only slightly off color. I may pick up a small pot of cherry stain for one last coat. Then a final coat of poly, for durability.

new bar top

The last thing I’m toying with is adding some glass doors to the bottom (or something). I really want to store our extra glassware down there, but I wouldn’t want them open to dust and such (yuck, right?). So we’ll explore our options for that.

simple, yet effective

Anyway, totally stoked that we found such a great furniture piece for such a great price! And refinished the top for free, since we already had the sander and the stain, is the icing on the cake. Can’t complain about that. 🙂 Slowly (slowly), this house is coming together.

Leave a comment

Filed under DIY, home improvement, projects

Mirror, mirror…

I am a self-professed Goodwill (or any thrift/antique store, garage sale) junkie. M will often roll his eyes at me when we pass one, and I say, “Can we look for just a minute!”

I can’t help it, I love old & used stuff.

old metal filigree mirror

So in my last visit to my favorite Seattle Goodwill, as I was scouting for other things on my list, I found this old, heavy, dusty, flaking, gold-colored metal mirror. I am a sucker for fancy filigree, so long as it isn’t cheap or flimsy or fake. This little mirror was darling! and only $1.99 – score!!

So I’ve seen lots of tutorials and before/after shots of SO many household items that have been given a second life with a new coat of spray paint. Until now, I had resisted the temptation to cover every piece of interesting junk I could find with bright colors. But here, I succumbed.

mirror frame, first coat

I loved the weightiness of this mirror, but I didn’t love the worn, flaky gold color. I decided to paint it a teal blue/green to match our livingroom area rug and throw pillows. I asked what M thought when I showed him my bargain treasure find, and he said – Awesome idea. 🙂 That teal is one of M’s favorite colors.

We found a good color match at our local Fred Meyer hardware department – a Rustoleum hue called Lagoon, smooth-satin finish.

Rust-oleum Lagoon

It took me about 10 light coats of paint over 3 days to get the amount of coverage I liked. This stuff was very easy to work with, and it dried really quickly, so I did 3-4 coats each day. It was tricky getting into all the nooks and crannies of this mirror! But in the end:

refinished mirror, detail


refinished mirror, Lagoon blue

It looks fantastic! It’s tough to get the color just right in the pictures here – it looks more greenish in real life. And it goes perfectly with our pops of teal in the living room. Now I just have to figure out where to put it… 🙂

gotta love bright pops of color

So I still have a whole can of beautiful teal spray paint…Now, what else can I refinish? 🙂

4 Comments

Filed under Crafts, DIY