Category Archives: projects

A sampling of custom ceramic works

Oh my gosh, it’s been a really long time since I’ve written anything here! I think about it often, but never seem to find the time to put my thoughts and ideas down in a blog post!

That’s life with a 2-year-old, I guess.

Anyways, I’ve been thinking about some of the great custom pieces I’ve made in the last couple years that don’t get seen by anyone but the customer. I thought it would be cool to post some pictures of them here. Interestingly, a lot of very special, unique pieces have been cremation urns.

P1080080

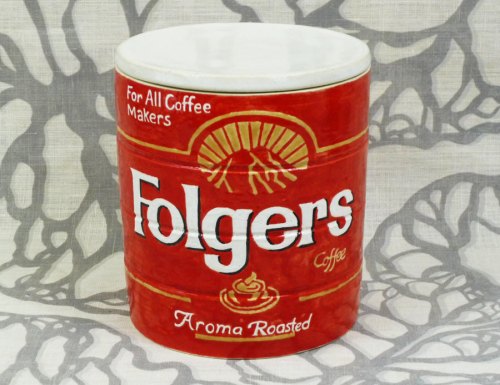
Coffee Can urn, a la The Big Lebowski

A lot of intricate glaze-work went into this Folgers Coffee Can Urn. Someone was a fan of the Big Lebowski

This Minions piece was very special – an urn for a very young person who loved the Despicable Me movies. It was a labor-intensive piece to ย build, but I think it turned out wonderfully. I hope it brought the family a little peace.

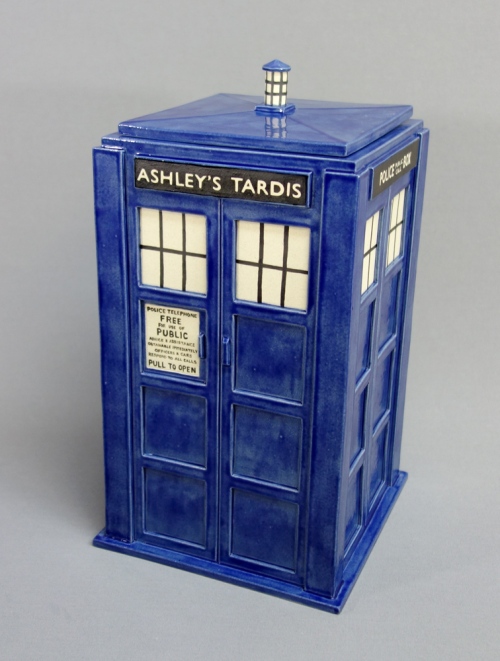
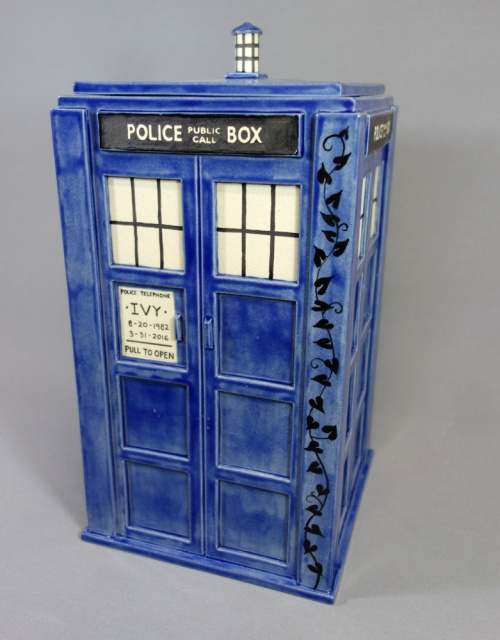
But by far, the personalized urns I make the most are Tardis urns. Adding names and dates and other special details makes each Tardis unique.

DSC03418

Large Tardis Urn

DSC04262

Tardis Urn with added Ivy filigree

You can find these Tardis Jars here on my Etsy site: Made-To-Order Large Tardis Jar

Being able to make special, custom and personalized pieces for people is one of the joys of doing what I do. I hope you enjoyed seeing these!


2 Comments

Filed under ceramics, Jadeflower Ceramics, projects

DIY Pull-over Bib with a Bow Tie

OK, so having a baby now doesn’t give me as much time to do the millions of things I have swimming around in my head. But here’s a project I absolutely forced myself to carve out time for.

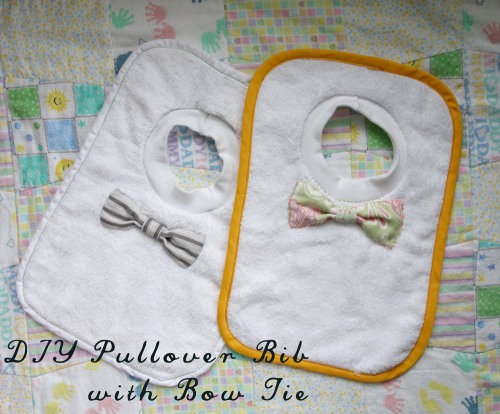
DIY Bib with bow tie

The little guy is a big drooler at the moment (he’s almost 4 months now, so I guess teething is a thing that starts around now?) and he basically soaks through 2-4 bibs a day. A lot of the bibs that he was gifted (usually as a set with a matching onesie) are teeny, and not really very useful. But two that we got were basically towels with a hole cut out for his head. Ah Ha. So I decided to try my hand at a cute versionย  – with a bow tie! Perfect for those “special” occasions, ya know. (Seriously, with wedding season coming up, not to mention just fun holidays and stuff, this little extra detail will be my one effort to cute-en him up).


Pull-over Bib with Bow Tie Tutorial
Materials:
>terry cloth (I bought1/2 yard at the fabric store, but you could easily use a towel)
>backing material (on my first bib, I just used another layer of terry cloth. on this one I used polar fleece)
>double bias tape
>stretchy rib-knit fabric for the collar
>colorful fabric for the bow tie
>thread, pins, scissors & sewing machine

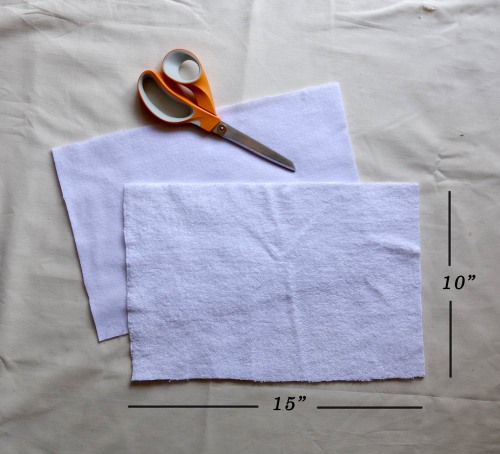
bib fabricStep ONE
Cut out your terry cloth and backing fabric to 15″ x10″


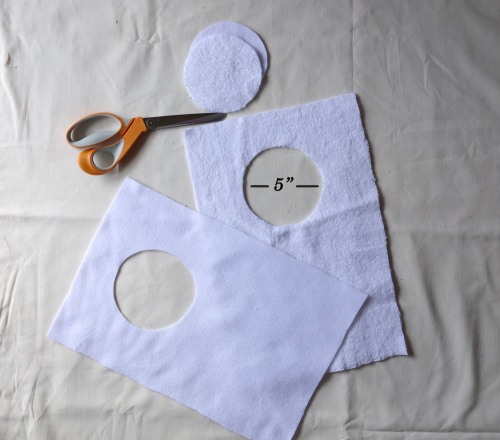
cut head holesStep TWO
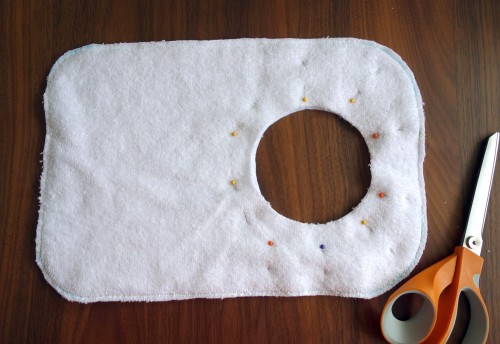
Cut out the hole for the head. My babe is about 4 months, and I wanted the bib to be somewhat snug while still comfortably fitting over his head. I made the opening diameter 5 inches. Positioned 2″ from the top and centered from side to side.


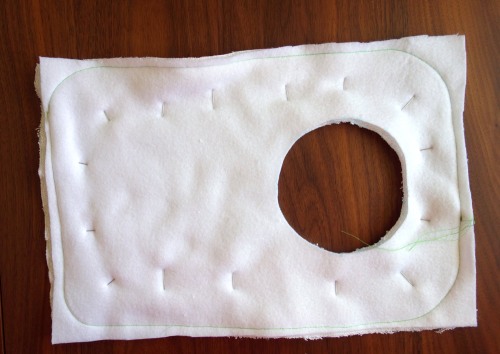
two layers sewn togetherStep THREE
Pin together your two layers (right sides facing outward). Sew a 1/4″ hem all the way around, and radius your corners (I used a light colored pen to mark the corners as a guide).


Trim the fabricStep FOUR
Trim your shape to about 1/8″ from your stitching. This will get covered up by bias tape later. Pin around the neck hole.


Pin bias tapeStep FIVE
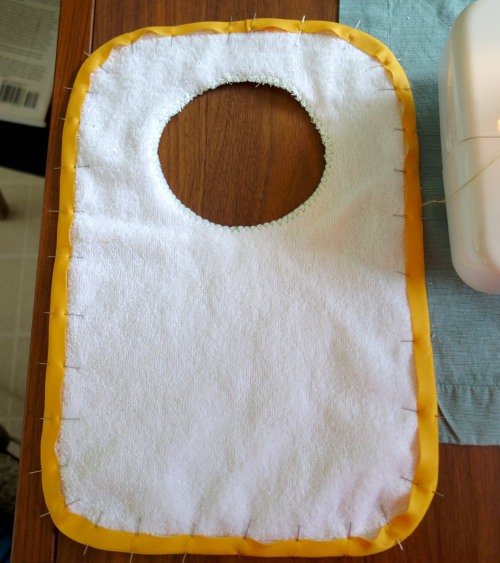
Sew around the neck hole with a V stitch (or use a serger). Then pin your bias tape around the perimeter of the bib. (This is a pretty good tutorial on how to sew with double bias tape and not have it turn out all wonky)


bias tape addedStep SIX
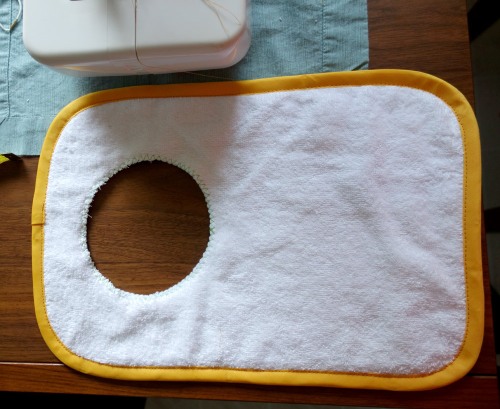
Stitch on the bias tape!


assembling the collarStep SEVEN
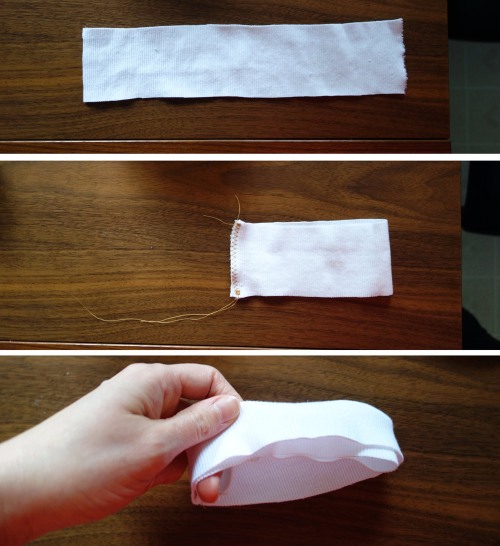
Cut a strip of knit ribbing 2.5″ x 11″. Fold it in half and sew the ends together with a V stitch. Then fold the whole thing over like a turtle neck.


pin collar to the neck holeStep EIGHT
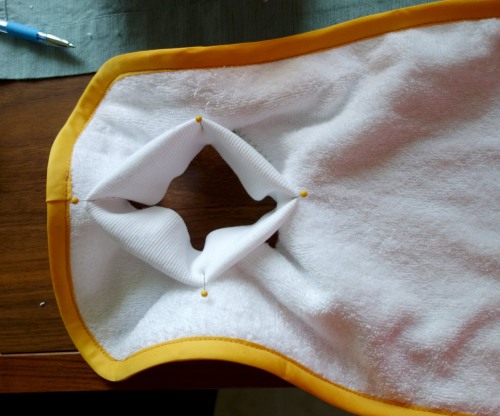
Pin the knit collar to the neck hole, matching the tops, bottoms and two sides. This will keep the stretch of the collar uniform.


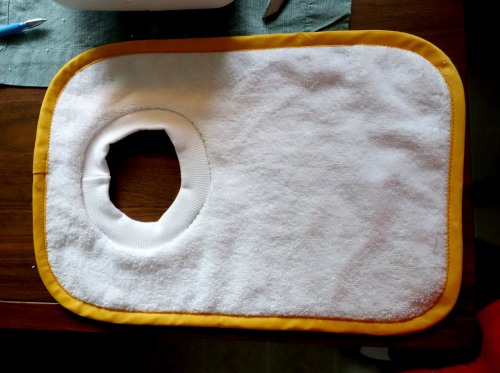
collar attatchedStep NINE
Sew the collar to the neck hole with a V stitch, making sure the sewn part happens on the back side of the bib. (This was probably the trickiest part of this project for me.)
And there you have a functional bib!

…and here’s adding the bow tie detail…

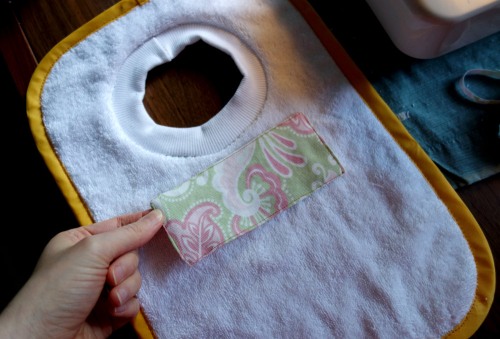
rectangle for the bow tieStep TEN
With your colorful fabric, cut a 5″ x 4.5″ rectangle. Fold lengthwise, right sides facing inward. Stitch almost all the way around with a 1/4″ seam allowance, leaving enough of a hole to flip the rectangle right-side-out. Once it’s flipped right-side-out, fold in your opening hole, and then stitch all the way around as close to the edge as you can.

sew the tie middleStep ELEVEN
Sew a tube for the middle of the bow tie. I did mine from a long rectangle 2.5″ wide, giving me a 1″ strip when it was turned right-side-out.

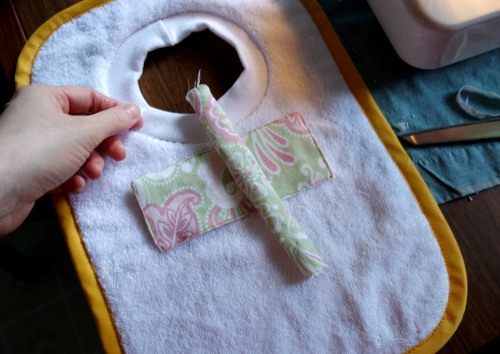
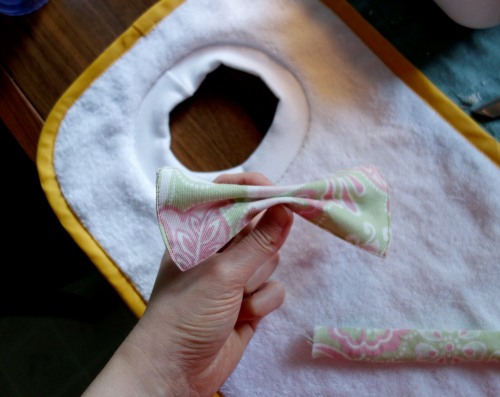
pinch the middle to make a bow shapeStep TWELVE
Pinch the middle of the big rectangle (like an accordion fold) and wrap the smaller fabric strip around it. Trim off the excess from the strip, and stitch it into place. Now you have your bow tie!

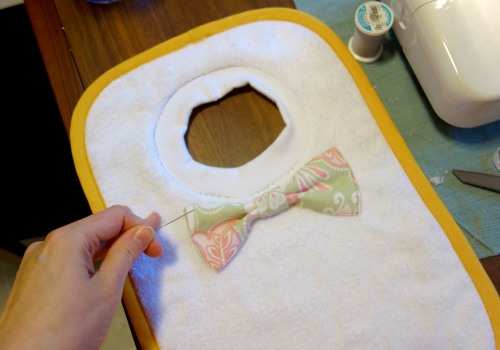
attatch the bow tie to the bibStep THIRTEEN
Position the bow tie pretty close to the collar and pin into place. Hand-stitch all around to secure in place (this will keep little hands from grabbing loose edges and pulling the bow tie off, with their orangutan strength).


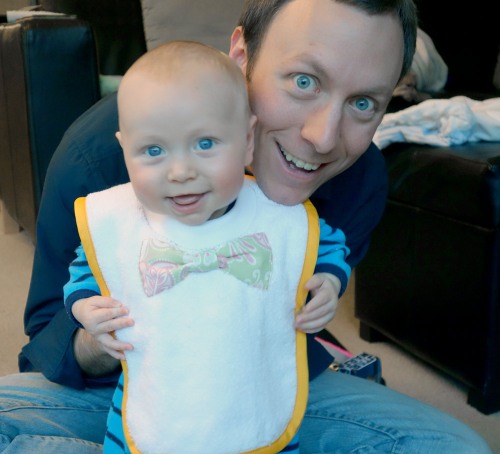
And there you have it! Slip the bib over your little one’s noggin and enjoy the cuteness. (Pay no attention to the crazy-eyed daddy)
bow tie bib

Something I learned while making this bib – terry cloth is MESSY! Cutting it will make a confetti of little cotton snow all over the place. And it will probably take a couple washings before the bib stops shedding them. Pbbt ๐Ÿ˜›

1 Comment

Filed under Baby, Crafts, DIY, projects, sewing, tutorial

A printable birthday card for Dad

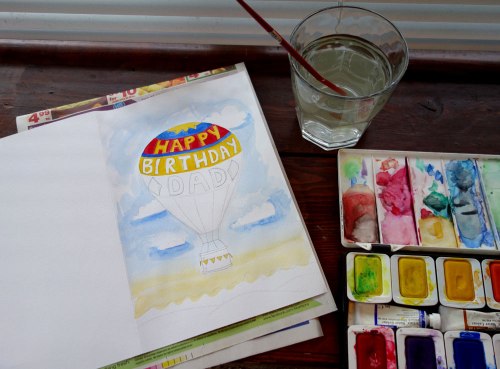
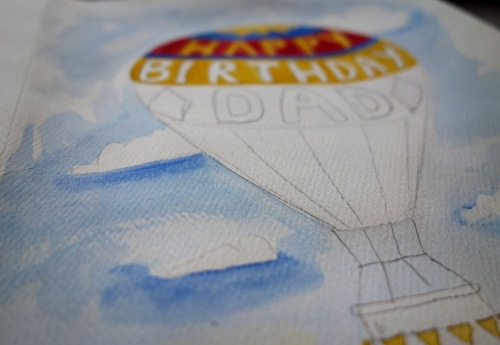
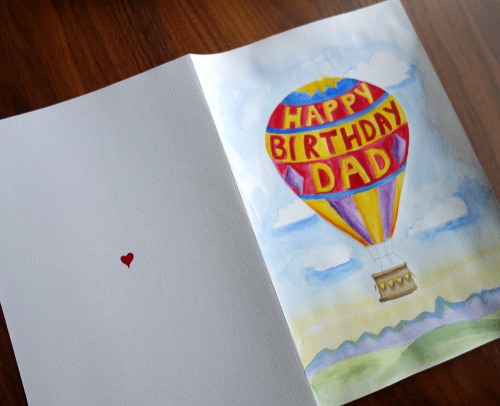
Today is my Dad’s birthday, and I managed to find a little time to break out my old set of watercolors and paint him a card.

You know, that homemade touch. ๐Ÿ™‚

DSC00951w

I haven’t painted for a really long time, but it was actually a watercolor class I took in college that made me choose Art as my major. Funny how things happen.

DSC00952w

After trying to find a simple card on the internet to download and print, I just couldn’t find something I really liked. So what to do? DIY, baby!
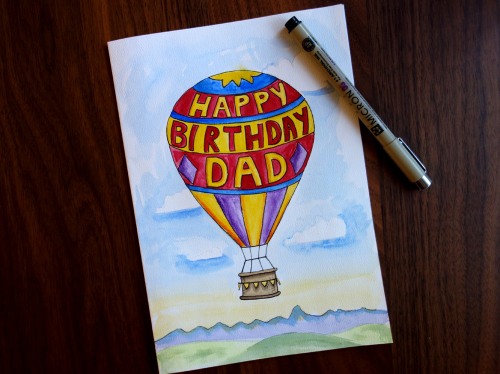
I chose to make it simple and childlike – lots of bright colors for this hot air balloon.

DSC00953wI don’t claim it as a great work of art, but I think my dad will enjoy it.
A little pen outlining to finish it off…

DSC00956w

And in case anyone else out there needs a fun and simple birthday card for their dad, I decided to layout a printable version. Free to download and print at home! Just print on cardstock, cut out, and fold down the middle.
Enjoy! Click to download: Dad bday Card

Leave a comment

Filed under projects

A valentine fort

I don’t consider myself the romantic type. I find most classic examples of romance (in the real world) to be, well, embarrassing. I’m much more comfortable with cute gestures of love than steamy, sensual, dramatic ones! What can I say, it’s just not me.

So anyway, M & I were talking about what to do for Valentine’s Day this year, and since I have no spare cash, after just paying my taxes (ouch), I suggested we just stay in and have a nice meal. And I mentioned, “oh and we should build a fort!” To which M just chuckled.

Little did he know. I was going to build a fort.

I grew up in a family with 3 brothers, and one of our favorite things to do was construct elaborate forts in the living room, from couch cushions, sheets, blankets and furniture. But my inspiration for this Valentine’s fort was from this picture:

Valentine’s Day Fort via Design*Sponge

This is my kind of romantic.

I wish I could say I have all kinds of rich tapestry linens hanging around my house, but I had to make due with what I could scrounge from my closets.
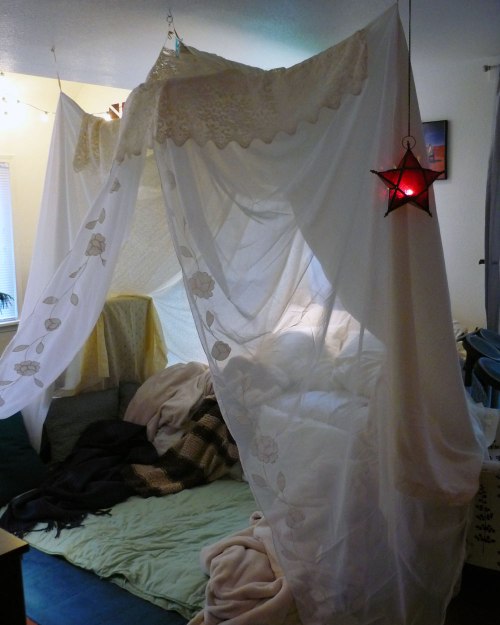
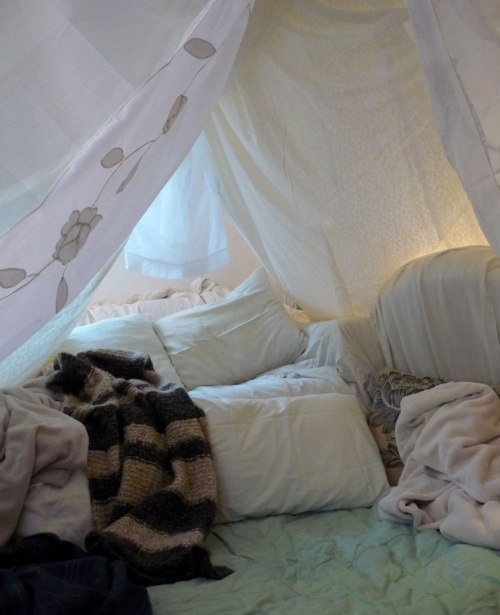
I found 3 gauzy curtain panels, a couple of flat sheets, 2 lengths of lace, and just about every throw blanket and pillow in the house.

my valentine fort

my valentine fort

I used the method in the Design*Sponge post – draping the sheets over a broom handle suspended from the ceiling, string and safety pins. I also used a large embroidery hoop in the front, from which the airy curtains hung.

Sure, it took me 2-3 hours to make this thing! Ah the perks of being one’s own boss. That’s right, I gave myself the afternoon off for this special occasion. ๐Ÿ™‚

cozy living room fort

cozy living room fort

I also made some chocolate truffles (what’s Valentine’s day without chocolate?).
The last finishing touch was gussying myself up. On a normal work day, since I work with clay all day and my studio is home-based, I wear jeans, a t-shirt, and my work sweatshirt. Rarely do I put on much make-up if I’m not going to see people.

For Valentine’s day, to complete the surprise, I wore this dress, an Anthro find from several years back:

Doris Shirtdress – Anthropologie

It’s super fun and colorful, and very retro 50s.
Then I did my face up all pretty-like.

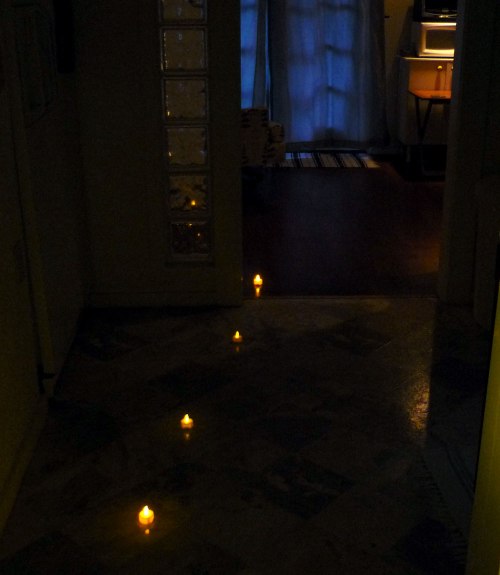
The whole thing was worth it when M got home, came through the back door, to find this leading him into the living room…

candlelit pathway

candlelit pathway

And then this on the other side…

valentine tent and a bottle of wine

valentine tent and a bottle of wine

The look on his face. Priceless. How can you not love a surprise living room fort? ๐Ÿ˜€

The rest of the evening was spent on the floor, with wine, dinner and a movie. Now that’s my kind of romance.

2 Comments

Filed under DIY, Holidays, projects

Pigs in Space costume: Happy Halloween!

So here is my final post, wrapping up my process of creating a Miss Piggy Halloween costume – the Pigs in Space 1st Mate Piggy costume!
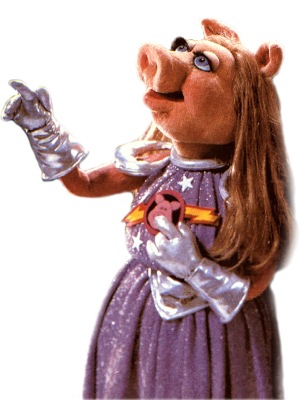
Where I attempt to transform myself into this iconic pig:

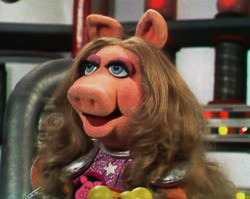
Miss Piggy – Pigs in Space

In my previous 3 posts, I went over how to make Miss Piggy Ears, sew a Pigs in Space uniform dress, and make a Pigs in Space felt logo decal. Now we put it all together with accessories!

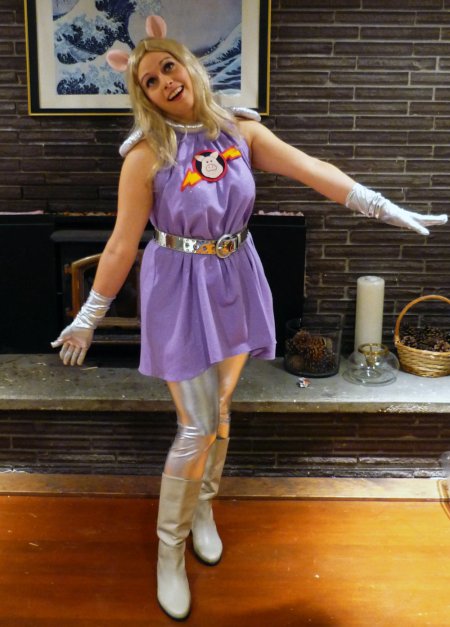
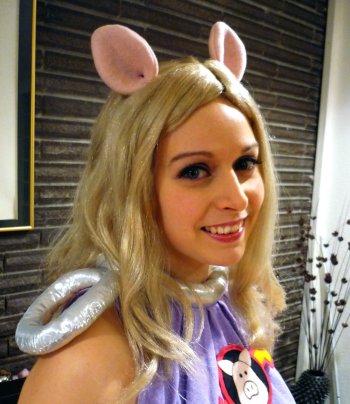
First Mate Piggy – finished costume!

Now, you can see, I stitched the felt decal onto the front of the dress. And I also stitched the ears onto the wig itself – which was great, since there was no bulky headband or obtrusive clips. And I can snip the threads later if I want to use the blonde wig for something else in the future!

First Mate Piggy costume – headshot

So here’s the breakdown of the Pigs in Space costume accessories:

First Mate Piggy, accessories!

Now, the above collage is more of a wish list for this costume, but I think I made due with what I had, or could get on short notice ๐Ÿ˜‰

First! A blonde wig. Very important to have the right hair. The wig I found was a tad bit too blonde, if you know what I mean. Classic Piggy hair is really more of a dirty blonde. You know, ‘cuz she was natural back in the day. (It’s so obvious that Piggy bleaches her hair these days, haha).

Classic Miss Piggy – pigs in space

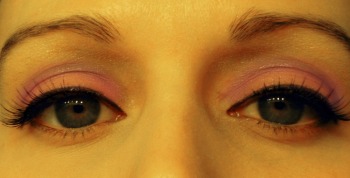
Next, the eyes! Piggy’s signature look is thick luscious eyelashes and a pink/purple eyeshadow. Also, her eyes are slightly downturned. I achieved this look with a thick line of eyeliner, false eyelashes, and a layered application of pink and purple shadows on the lid.

sultry Miss Piggy eyes ๐Ÿ˜‰

Next comes all the silver! Miss Piggy always wears gloves, and in her Pigs In Space costume, she trades her signature purple gloves for silver ones. I found mine on Amazon.
Then you’ll need a silver belt. Of course, you can make one, but I lucked out and found a shiny metallic belt at my local Goodwill for $4. Score!

Then we get into debatable territory. Since most Muppets don’t exist below the waist, the only reference I had to go on for the bottom half of Piggy’s costume was from an action figure:

First Mate Piggy doll

You can see she has silver leggings and silver knee-high boots.
As luck would have it, I already owned some shiny silver leggings (from two Halloweens ago – when I dressed as a Cyberman..er..woman). They are from American Apparel, and pricy, but I’m glad to get multiple uses out of them!

Then the boots…well, I didn’t want to splurge on silver boots when I’d probably never wear them again. So instead, I used my off-white boots, which were from my Princess Leia costume from 5 years ago. Lol…yes, I generally choose very nerdy subjects as Halloween costumes. I’m cool with that.

First Mate Piggy costume – Happy Halloween!

So there you go! Happy Halloween to all you folks. Hope it’s a fun one! Kissy kissy!

7 Comments

Filed under DIY, Holidays, projects, sewing, tutorial

First Mate Piggy Costume Tutorial: Pt 2 – Sewing Piggy’s Space Dress

OK! So perhaps you have your Miss Piggy Ears, and now it’s time to get moving on the actual dress of your First Mate Piggy costume.
As I mentioned last time, I’m planning on a Miss Piggy costume for Halloween this year – specifically, in her Pigs in Space outfit. Since I didn’t find much on the interwebz to help me make a costume, I’m writing up a tutorial on how I’m constructing mine! Enjoy ๐Ÿ™‚

Disclaimer: I am not an experienced seamstress! Most of my methods are just from figuring things out as I go, so take these instructions with a grain of salt. If you have pointers, tips or other suggestions for folks who may try to attempt a similar costume as the one I’m making, feel free to share in the comments!
Also, I’m about a size 8. This dress design is a loose-fitting babydoll shape until you add a belt, so I’d guess it would work for sizes 6-10. Again, this is just a basic how-to. Please adjust your own costume according to your needs! ๐Ÿ™‚

First Mate Piggy costume tutorial – before adding accessories!

Materials:
2 yards light purple fabric (I found a lavender flannel with silver sparkles! what!?)
1/2 yard silver metallic fabric
matching thread
polyfil stuffing
eyes & hooks (or other fastener of your choice)
Piggy Dress Patternย as measurement guide

purple flannel and silver metallic fabric

First, using the PDF guide I made above, cut out the dress shape. The front and the back are identical, so you’ll need two.

dress shape cut out

Please ignore the fact that I didn’t iron my fabric (for shame!).

Next, pin the two pieces together inside-out (making sure the good side of the fabric is facing inward) and using a 1/4″ seam allowance, stitch the sides and the shoulder straps. When you turn it right-side-out, it’ll look something like this:
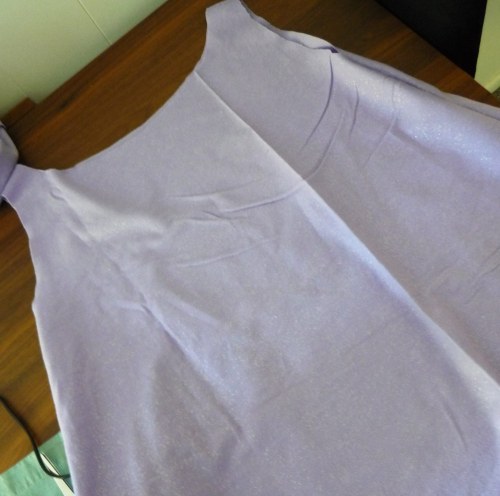
stitched edges, right-side-out

Next comes hemming the bottom edge. I did a 1/2″ (or so) hem, and used a zigzag stitch so it would lay nice and flat.

hemming the bottom of the dress

You’ll also want to hem the armholes in this way, too, for a nice finished edge. I used a 1/4″ hem for the arms (sorry there’s no photo!).

Soon, we’ll be gathering in the neckline, so the next step is making a slit down the back, so you can fit your head in when it’s done! Find the center of the back, and make a 6″ cut straight down.
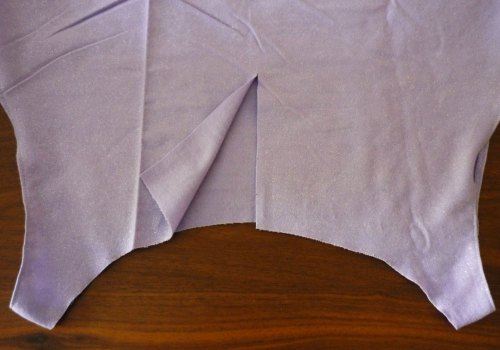
6″ cut for the head opening

Pin the edges back about 1/4″ inch and hem it.
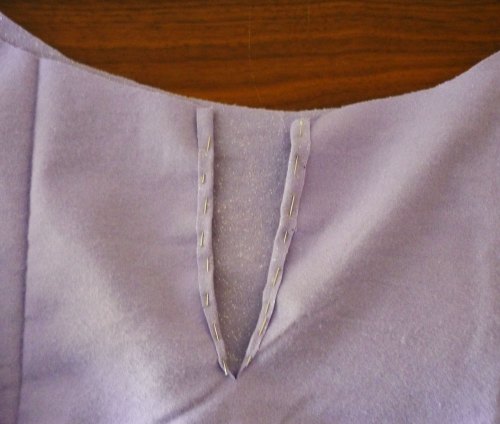
pinned – ready to hem

Once that’s hemmed, we’ll begin pleating the neckline.
Find the center of the front, and make a 1″ accordion-type fold, like so:
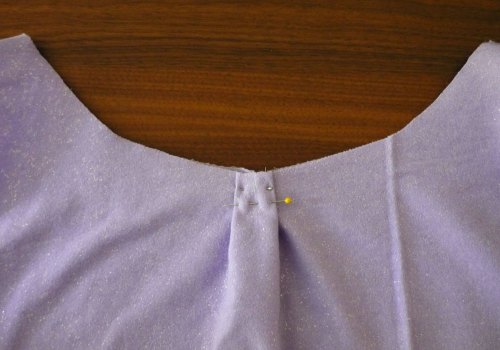
first center pleat of the neckline

Continue folding pleats on either side of your first one, pinning as you go. Make sure they are symmetrical. I got 5 total pleats.
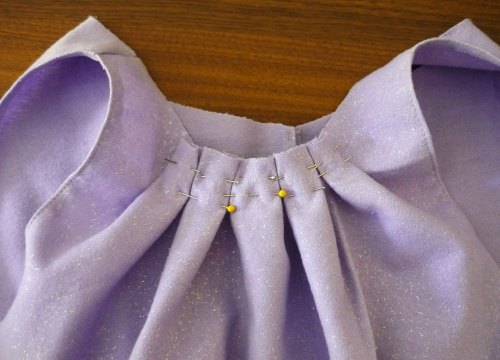
front pleats, pinned

I used lots of pins, just to make sure it didn’t come apart when I took it to the sewing machine!
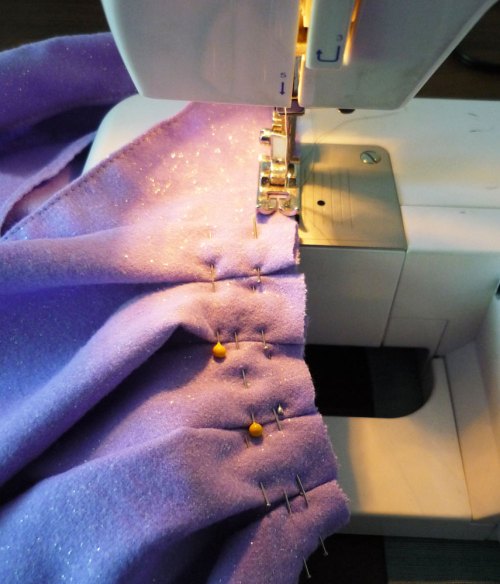
sewing the front row of pleats

I was surprised at how well this worked! (haha) It really brought the neckline in, and the dress is starting to look like a real piece of clothing.
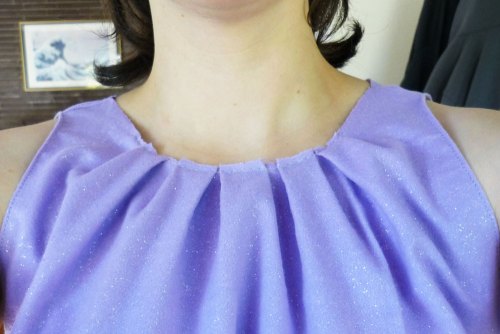
pleated neckline – front

And now, because the dress is still all floppy and open in the back, we need to pleat the back, too!
Using the same folding and pinning method, add pleats to the back of the dress.
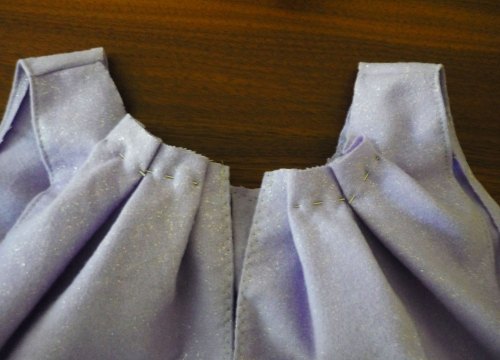
back pleats, pinned

I got two 1″ pleats on each side of the slit. Pin it up and then take it to the sewing machine!

At this point, you can sew a set of eyes and hooks to the top of the head opening, so that you can clasp it closed.
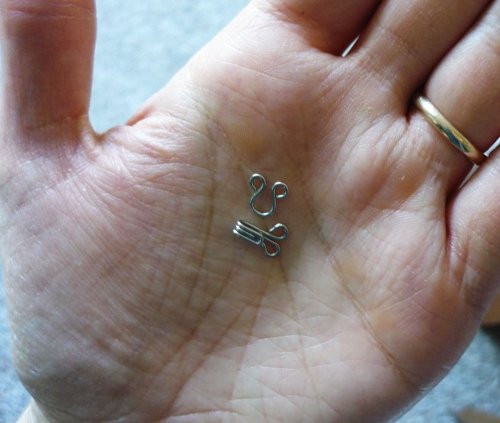
eye & hook

Next it starts getting trickier, because we’re adding the silver trim to the dress. And I didn’t take as many pictures of this part as I should have. Forgive me!

We’re moving on to the puffy silver collar on Piggy’s dress.
Cut out a piece of your silver material that is 4″ wide and 18″ long. Stitch this into a long tube, with open ends. Then turn the tube inside out. Then you take this silver tube and pin it to the neckline of the dress. (There will be extra fabric hanging off either end)
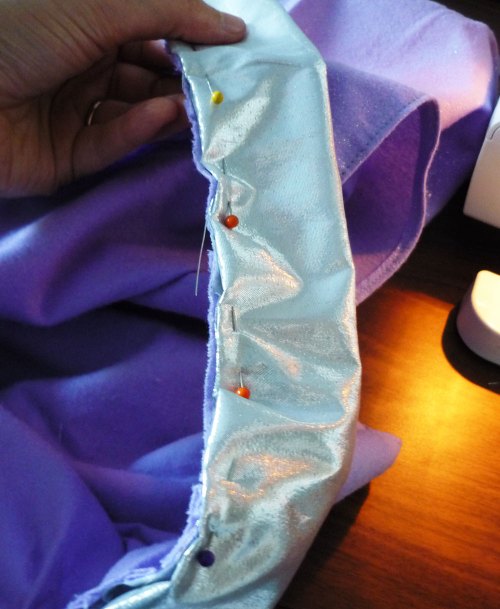
silver trim pinned to neckline

Stitch them together with a good tight stitch. When you finish this step, you should have something like this:
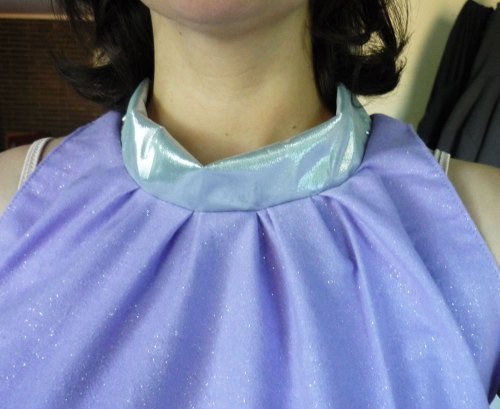
silver neckline, sewed on

Now we need to stuff that collar! Grab your polyfil and pack it in good and tight through the openings at either end.

adding stuffing to the collar

Once the collar is filled to a uniform density, trim off the excess silver fabric, but leave enough to fold over twice – you’ll sew each end closed this way. Add another eye & hook to the top of the collar for closure.
Here’s what the padded collar should resemble:
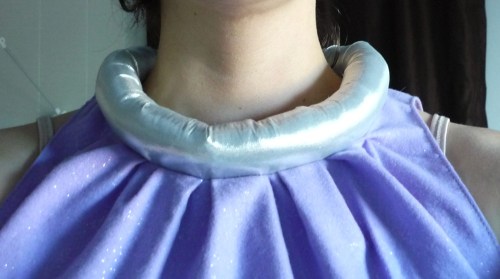
padded collar

We’re almost done! Next up we have the silver shoulder loops, or epaulettes if you will, which complete the look. I made a simple template with paper – it’s a 7″ diameter circle with a teardrop shape cut out of the middle. The width of the loop is about 2.5″ and tapering at the ends. Cut out 4 of these in your silver fabric.
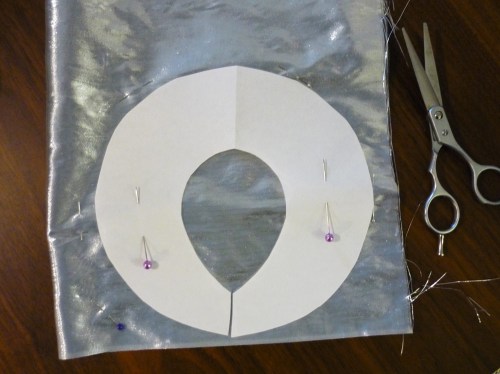
prepping the epaulettes

Stitch 1/4″ all the way around, except leaving a 2″ gap somewhere so you can turn the shape inside-out.
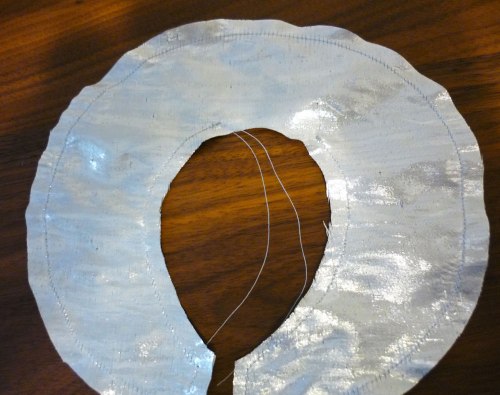
stitched up with a 2″ gap at the inner top

Turn it inside out, and it looks like this:
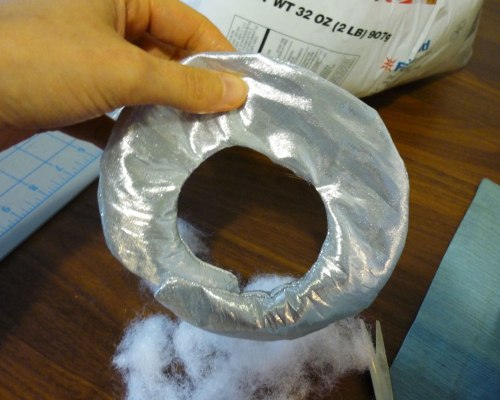
epaulette, ready for filling

Add your polyfil, just like you did for the collar. When it is filled, stitch closed the opening (I used a needle and thread, not the machine, for this).

finished epaulette, ready to attach to the dress

Once you have two of them stuffed and sewn closed, they’re ready to sew onto the dress. Using a needle and thread, attach each epaulette to the top of the shoulder, as close to the collar as you can.
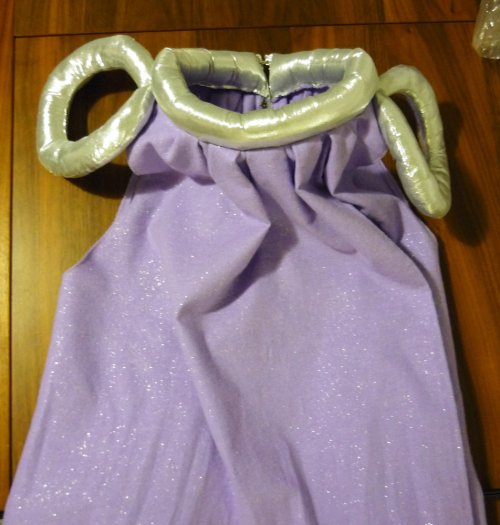
finished dress with trimmings

And there you have it!
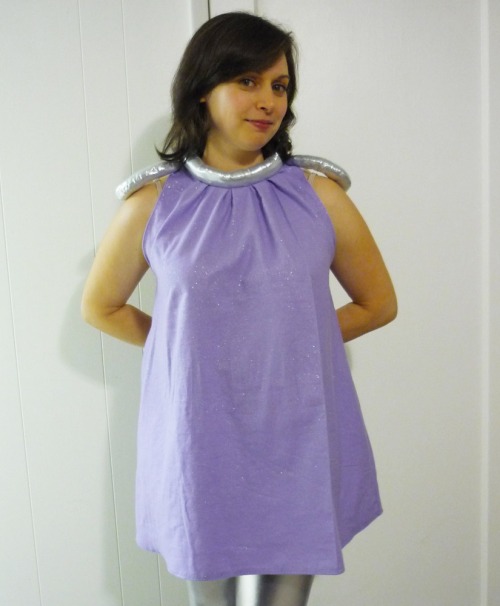
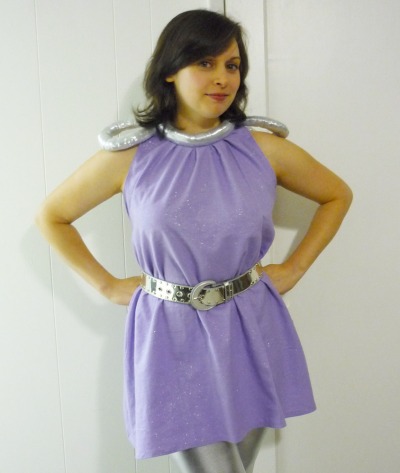
the finished dress

Add a belt to complete the shape.
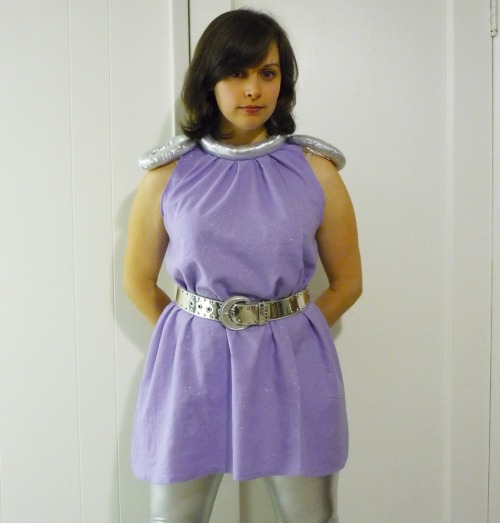
Add a belt to complete the shape

But of course, the costume isn’t finished yet! Lots of accessories to discuss, next time! See you then ๐Ÿ™‚

2 Comments

Filed under Crafts, Holidays, projects, sewing, tutorial

From Pin to Party

I agree with the majority of folks out there that Pinterest is pretty fabulous. While I’m not one of those people who has to “pin all the things!!!” I do enjoy having a visual space where I can collect all my favorite finds from around the web in one neat little package. And it’s a great planning tool! You can find all my pins right here.

I used my Pinterest as a planning tool for an event I put on over the weekend. I celebrated my 30th birthday! In reality, I had a 4-day celebration, starting on my actual birthday (on Thursday) and through to Sunday, but my little party was Saturday, and Pinterest was a big help in guiding my inspiration.

Ever since my wedding, I really enjoy planning parties and executing all the little details! This one was no exception. I had a handful of fun craft projects.

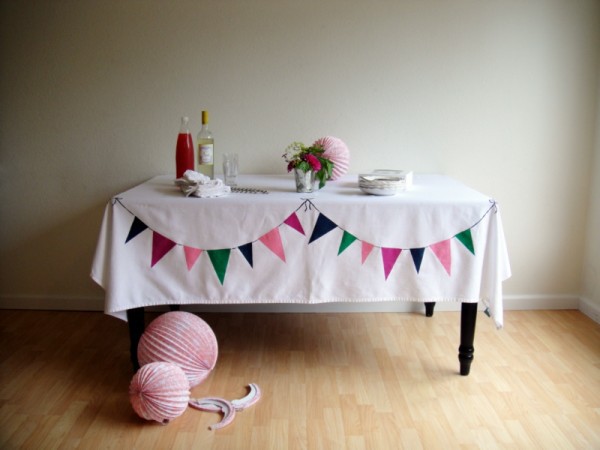
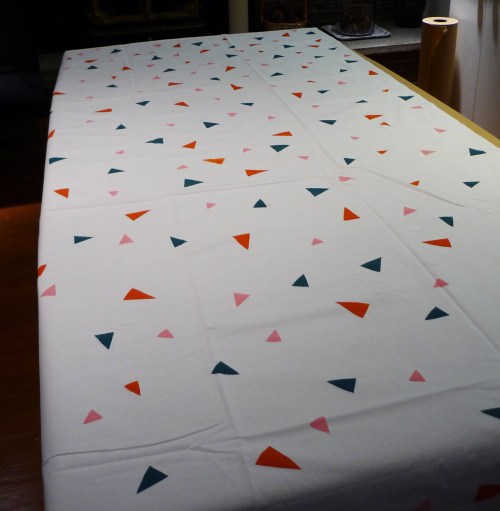
First, I have been enamored of this tablecloth idea from the moment I saw it:

DIY Bunting Tablecloth from The Sweetest Occasion

ย I loved this idea for ages before I got around to making my own painted tablecloth.
I took a different design direction, but the process was the same.

Start with a plain white tablecloth or fabric. Line underneath with paper or dropcloth. Painting supplies: Acrylic Paints, Acrylic Fabric Medium, Sponge brush, paper templates cut into triangles

I wanted a kind of triangle confetti pattern, and I chose a dark orange, pastel pink and dark turquoise for the color palette. Fun party colors!
After an hour or so of stamping (M helped too, the sweetie!) this was the final result:

party tablecloth, finished!

Once the paint had thoroughly dried, the final step was to heat-set the paint with an iron (following the directions on the Fabric Medium bottle).

Once craft down! Many to go!
Next, I’ve loved the use of paper for decorations for some time. Whether it’s craft paper, patterned colorful paper, or tissue paper. Love it all! And these images really got me inspired:

pretty paper decorations, image from LeSueur Interiors

Pretty paper medallion backdrop, from Kara's Party Ideas

Tissue Paper Decorations, from realsimple.com

So for about a week prior to my party, I started folding paper into fans, and taping those fans into round medallions. All different colors and sizes. Some with petal edges, some just straight, some with doilies in the centers, some without. All of them coordinating with my blue-orange-pink color scheme.

My Paper Medallion Party Backdrop

I love the overlap of all the different sizes and colors! It just looks so cheerful!
To hang them, I used clear fishing line taped to the back of each medallion, then tied to clear push pins into the ceiling, visually gauging where each one would look the best with height and overlap. You could see the pins and the line if you looked closely, but for the most part they were invisible!

For party food, I knew I wanted to keep it simple (purchasing my veggie platter, sliced cheeses, hummus and pita, and mixed nuts), because the one thing I wanted to make myself was Cake Pops!

Cake Pop 101, from A Beautiful Mess

This was my first experience making cake pops. And in fact, my first time eating cake pops! But I’ve loved the idea and the cute presentation ever since first seeing it on Bakerella. I bought my sticks and candy melts from Michaels, and was all set to concoct these pretties.
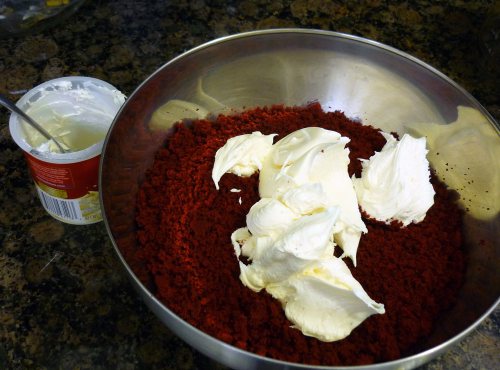
I discovered that my mixture was far too gooey! One boxed cake + 1 can frosting turned out to be a very wet ratio! Next time I make these pops, I’ll start with less frosting and mix in more as needed, rather than dumping the whole can in at once (live and learn)!

cake pops, before being mixed

So as a solution, I quickly baked a half-recipe for simple chocolate cake from scratch, and added that to the mixture, which helped firm up the “dough.” All in all, my pops turned out super cute, and they were a big hit with everyone.

My finished cake pops

Another sweet treat that Pinterest inspired was Italian Sodas!

DIY Italian Sodas, from the Salty Pineapple

So I madeย  my own little drink station with fun soda-fountain glasses and fun stripey paper straws from HeyYoYo on Etsy!

Italian Soda station

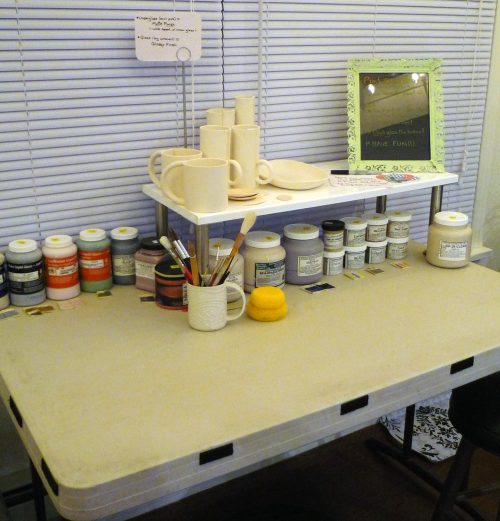
My last bit of party planning wasn’t inspired by anything I’d seen on the webz. But as a ceramic artist, I wanted to share a bit of myself with my guests, so taking a cue from those “paint your own pottery” places, I set up a crafting table where people could glaze a piece of pottery I’d made especially for the occasion.

my very own "paint your own pottery" station!

A random assortment of mugs and vase cylinders that could be personalized! It took some coaxing to get people to jump in, but those who did enjoyed it! I’ll be firing those pieces later in the week and sending it to my friends who participated! ๐Ÿ™‚ Hopefully they’ll be a fun little souvenir of the evening.

So in conclusion, I had a fantastic time turning 30.ย  And I am truly looking forward to a new decade and a new chapter in my life. I absolutely loved my 20s, but I have no regrets leaving them behind. Maybe because I enjoyed my 20s so much is why I’m optimistic about the next 10 years! Life is basically good, and I have a lot to look forward to. Not least due to my wonderful friends and family. โค

5 Comments

February 28, 2012 · 7:48 am

happy post-halloween

Before it is completely un-relevant, I want to post a few pics from Halloween!

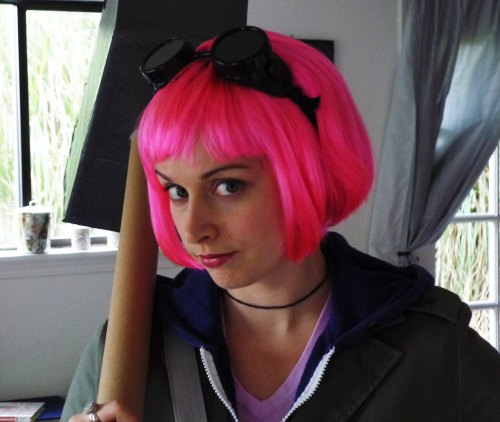
M and I decided to dress up as Scott Pilgrim and Ramona Flowers from one of our favorite movies from the lastย  year or so! M had it so easy, but my get-up was a little more involved.

ramona flowers costume

But of course, I never make anything easy for myself!
Here’s what I decided I needed to make a sweet Ramona Flowers costume…
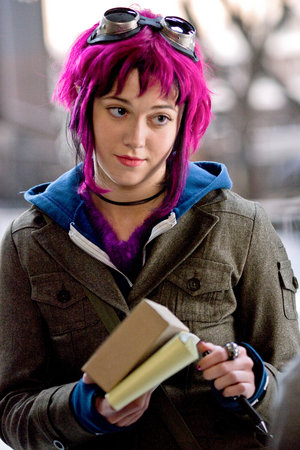
My reference pictures of the lovely Mary Elizabeth Winstead

And…

And…

So let’s start from the ground up!
*Fuzzy brown knee high boots (yay, I already owned a great pair!)
*Opaque pink tights (I found mine on Ebay)
*Navy blue nylon shorts (scoured the local thrift stores and found a cheap pair)
*Blue hoodie sweatshirt jacket, preferably with a white zipper (I totally lucked out at Value Village)
*Military style green coat (yay, already owned this too!)
*She wears a purple-pink fuzzy sweater under all this, but I figured this would be way too hot, so I just wore a light pink t-shirt
*A black double string necklace (I literally just tied a black string around my neck)
*Of course, some kind of colored hair! Pink, blue, green! (This wig is reeeeeeally bright pink, but I couldn’t find a good cheap wig in the right color and style. This one was $10 from Goodwill…and it was new, btw)
*And lastly, steampunk goggles (I found mine on Amazon for a great price, under ‘welding goggles’)

*Her make-up is easy, a little eye liner, mascara, and bright peachy red lipstick

ramona flowers costume, head shot!

Oh, and of course, the big accessories! I had a heck of a time at the thrift stores finding a round purse I could transform into Ramona’s signature star purse. So I looked up some tutorials and attempted to make my own. I am super happy with the result, and I will totally use this as a normal purse! Here are some good resources if you want to make your own: Dulce Et Utile and this Instructables post.
And then there’s the giant hammer. I used a big cardboard tube and a make-shift cardboard top part, held together with hot glue and tape, haha, and spray painted silver. Awesome, right? Hey, it’ll do!

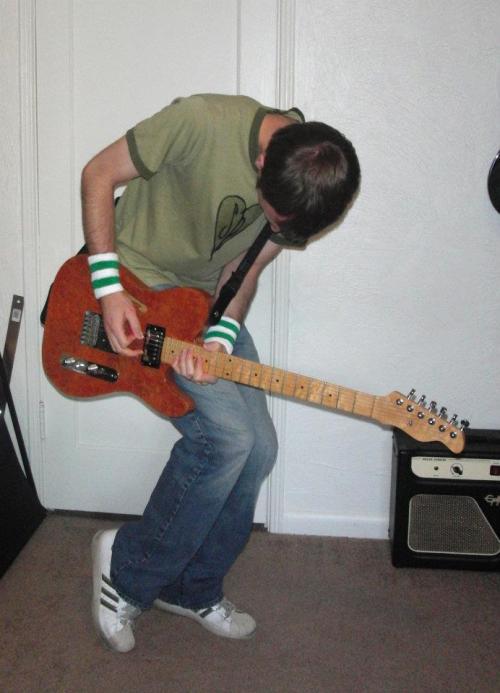
And here’s all M had to do…pose with his guitar ๐Ÿ˜›

M as scott pilgrim

But really, he’s kinda spot on…

Anyways! Fun time over the weekend. Now looking onward. The long march to Christmas! busy busy busy


Leave a comment

Filed under Holidays, projects

Crazy times

Ok. It’s been a crazy week here.

Mainly because of some awesome internet exposure for my Tardis Teapot. I don’t know who kicked it off, but my friend let me know that it was here(the bird and the bat), and clearly, this lovely lady has some awesome followers. I can’t tell ya how blown away I am at the response to this funny li’l teapot, and how exciting it is!

So now I have an order list for Tardis Teapots a mile long (!) and still growing, and I guess I know exactly what I’ll be doing every day for the next couple of months, lol! (ahem, building teapots…)

BUT, in other events, things I finished up before the madness began… I want to share a few project I’ve finished. If I wait any longer the moment will have passed!

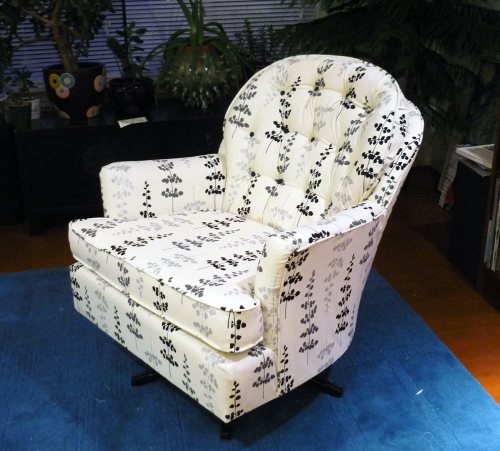
Back in August, my mom and I started a project to re-upholster an armchair that I bought at Goodwill for $15. It was such a comfy, well-built chair that I couldn’t pass it up at that price. The only downside was its awful color. It basically clashed with everything M and I own.

This is the only before picture I managed to get before Mom and I started ripping it apart:

the pink armchair, BEFORE

It wasn’t in bad shape…it’s just that it was, well, pink velour. Yeah, not so much.
So after 3 months of working piece by piece, just learning and adjusting as we went, HERE is what we finally finished with (drumroll, please!)

my stylish reading-nook armchair, AFTER!

The fabric is this fun light canvas print that M and I picked out together from Joann‘s

Fabric: waverly floating petals in black

We thought it was a great modern print, and there’s a bit of bling, in the silver colored branches (yes, sparkly!), in addition to the clean black and gray of the other branches.
After several days of hard work, Mom and I succeeded in finishing my awesome chair.

NEXT, another sewing project that I just finished was this awesome round purse:

ramona flowers subspace purse!

This is a sneak-peak at my Halloween costume…yeah, I’ll be Ramona Flowers from Scott Pilgrim vs. the World. And yes, M will be Scott Pilgrim. I’ll post pics after Halloween, for sure. ๐Ÿ˜‰
The purse was definitely a hard project, and I just figured out how to sew it from looking at pictures and trying to make sense of a round shape. Oh, and sewing with piping is a bitch! That’s all I have to say about that.
But I think it turned out better than expected! Now I just have to pair it up with my pink wig and giant cardboard hammer, hee hee.

OK! Too much time spent bloggin’ already! Gotta get working on those teapots!
Oh, and one last update – here’s the current NEW & IMPROVED shape of the teapot spout, for anyone who is interested:

Jadeflower Tardis Teapot,with updated spout

3 Comments

Filed under Day to Day, Jadeflower Ceramics, projects, sewing

Reflecting on July

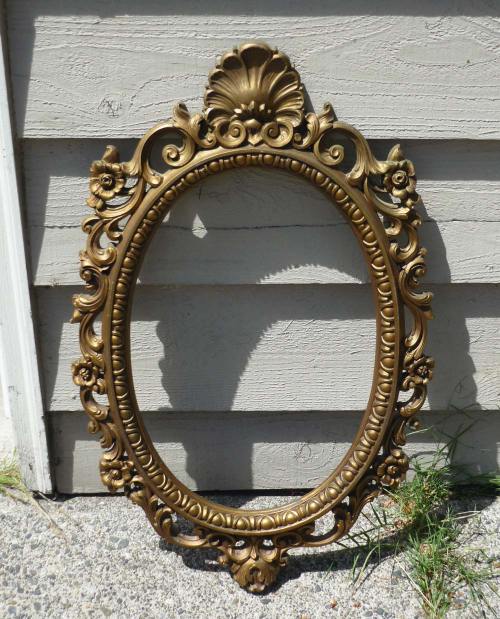
This month I had another small re-vamp project that was on the list for ages. I seem to have a penchant for mirrors with decorative frames, especially if they are oval. So when I found this large ornate brass-colored mirror frame at Goodwill (for $5!!), there was no way I wasn’t taking this baby home with me.

brass-colored mirror frame

Yes, it also had a mirror, it’s just not pictured here….because – wait for it – I decided to paint the frame! I’m sure you saw that coming. ๐Ÿ™‚
The moment I saw it, I knew this frame would look so great in a solid color, to update the look, give it a more modern vibe. It is plastic (not metal), and the brass finish was a bit too grandma’s-house for my current decor tastes. So I settled on a glossy white (mainly due to the fact that M had purchased a can of spray paint in this color recently and there was nearly a whole can of it left over, score!).

So after many many thin coats of paint later:

mirror frame refinished in white

I love how it almost looks like a plaster, with just a hint of gloss.
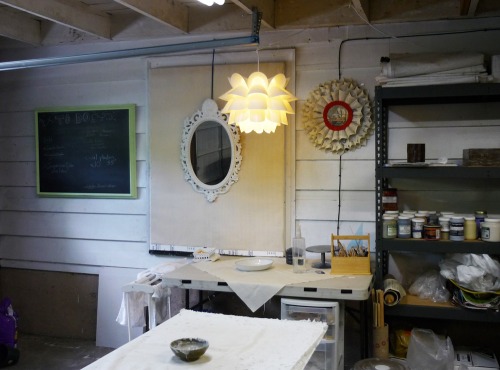
You may notice in the reflection…yep, those are garage doors. I’m hanging this guy in the garage, in my studio to be exact. ๐Ÿ™‚

the jadeflower ceramics studio

My studio space is still ever-evolving in the decor arena; for the most part it is strictly functional. But here and there, I am trying to add little touches to make it a pleasant place to spend my hours. If you’ve been reading my blog for a while, you may recognize some past projects like this and this.

Our garage is a quirky place. Did you notice it looks like outdoor siding on that wall above? Well, M and I have a (strong) hunch that the garage was added much later to the house. Exhibit A: outdoor siding. Exhibit B: that rectangle the mirror is hanging in front of is actually a window that the landlord covered up with a big sheet of foam insulation (and which I then covered up with some striped vintage wallpaper because it was ugly!). Oh funny old houses ๐Ÿ˜‰

In unrelated news, we had a busy July. One highlight was a housewarming party M & I hosted, now that we are pretty much settled into our new abode. We celebrated with tacos, fun drinks, and lawn games (with thankfully cooperative weather!). At the end of the evening we lit sparklers saved from the 4th of July! ^_^ Everybody loves sparklers, right?

sparklers!

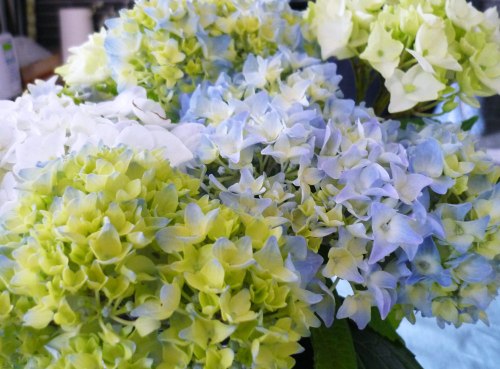
The party was also to celebrate M and my first anniversary. Awwww ๐Ÿ™‚ It’s hard to believe it’s been a whole year since this fantastic day. My mom and dad brought us a vase of hydrangeas cut from all the plants that were bought the year before; she says that they’ll always have a reminder of our wedding with all the pretty blues/greens/whites of the hydrangeas that now decorate their property.

hydrangeas

A very fun and event-filled month! And August should be just as busy! Until next time ๐Ÿ™‚

1 Comment

Filed under Crafts, DIY, Events, Jadeflower Ceramics, projects, Wedding